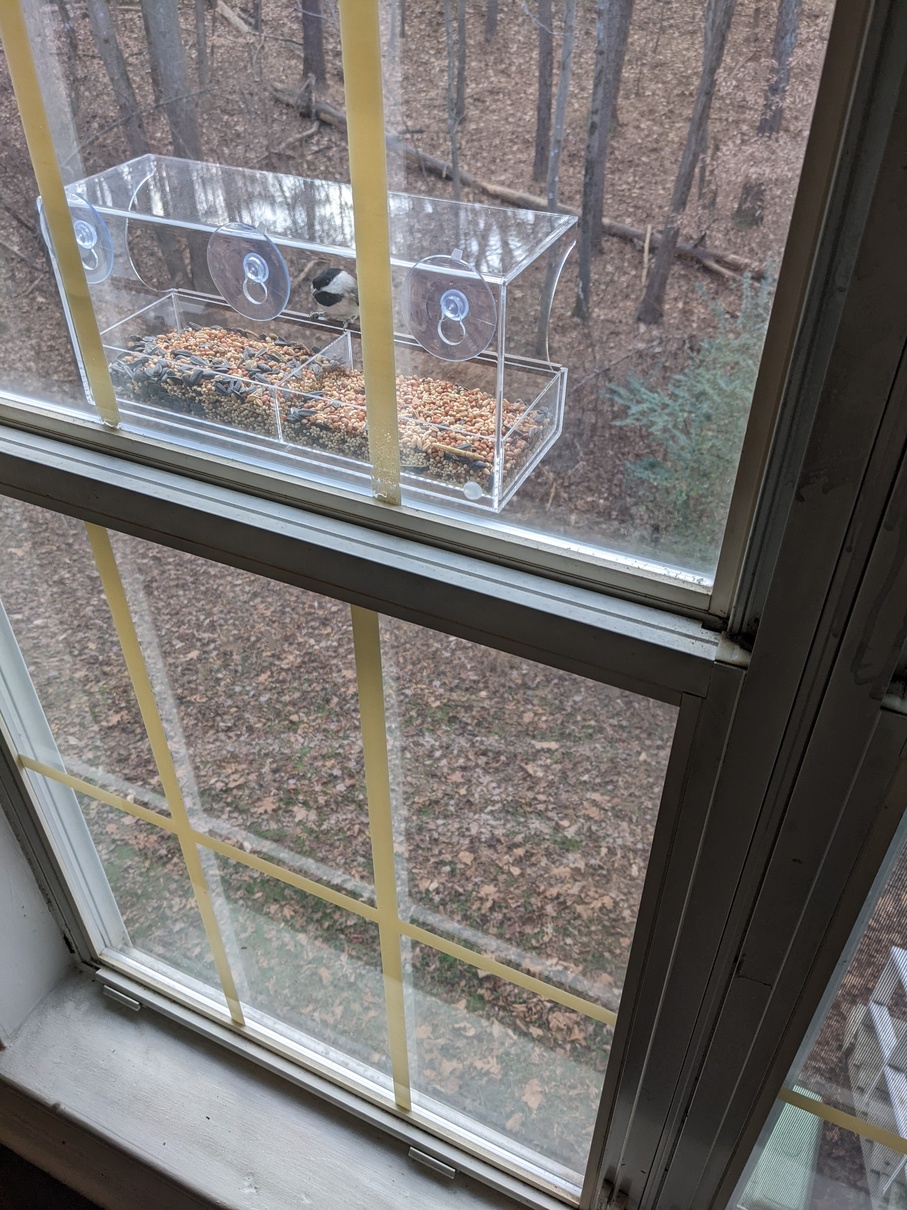
Recently I received a window-mount bird feeder as a secret santa gift (thank you!). As someone who loves birds I was excited to put it up and get a close up view of some of the birds that inhabit the woods around where I live. It’s a great little feeder and within around 3 days I had birds showing up regularly.
Installation
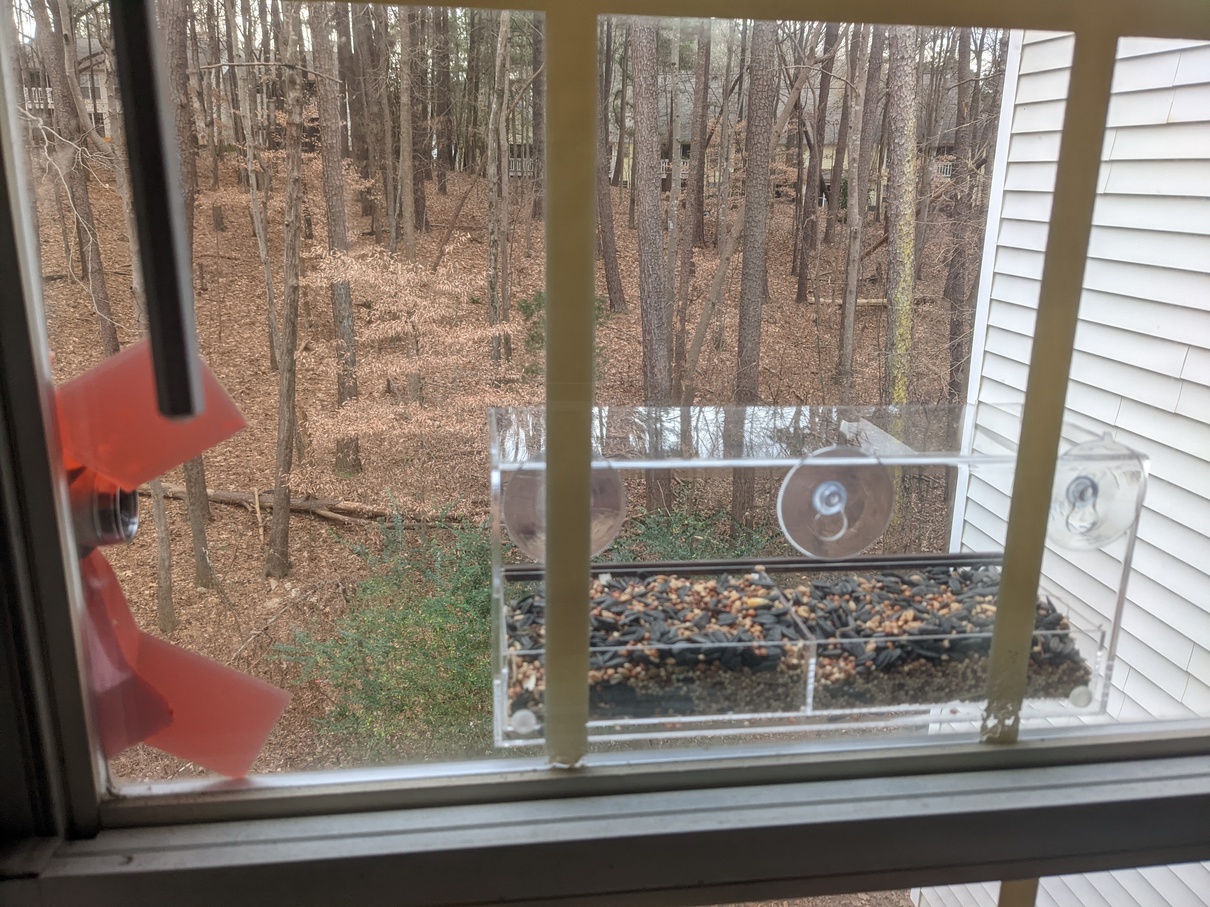
With the floor plan of my apartment, the only sensible place to put the feeder was on the kitchen window; there’s a screened porch on my bedroom window, or I would have put it there. Since I work out of my bedroom, studio style, I thought it would be cool to be able to watch the birds when I wasn’t in the kitchen, for example during the workday. To this end I put a webcam up pointed at the feeder connected to an old laptop. I streamed it to my twitch, and watched that feed in a browser tab while I worked. A few friends watched as well for a little while, which was cool.
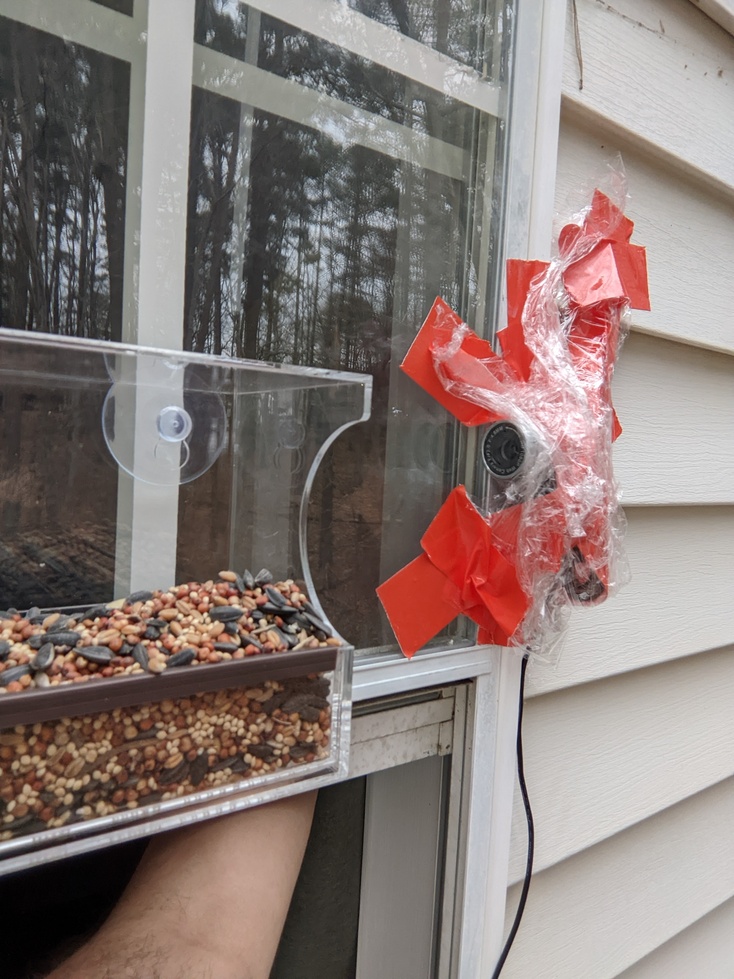
The plastic wrap was my first attempt at weatherproofing. Subsequent attempts greatly improved the design.
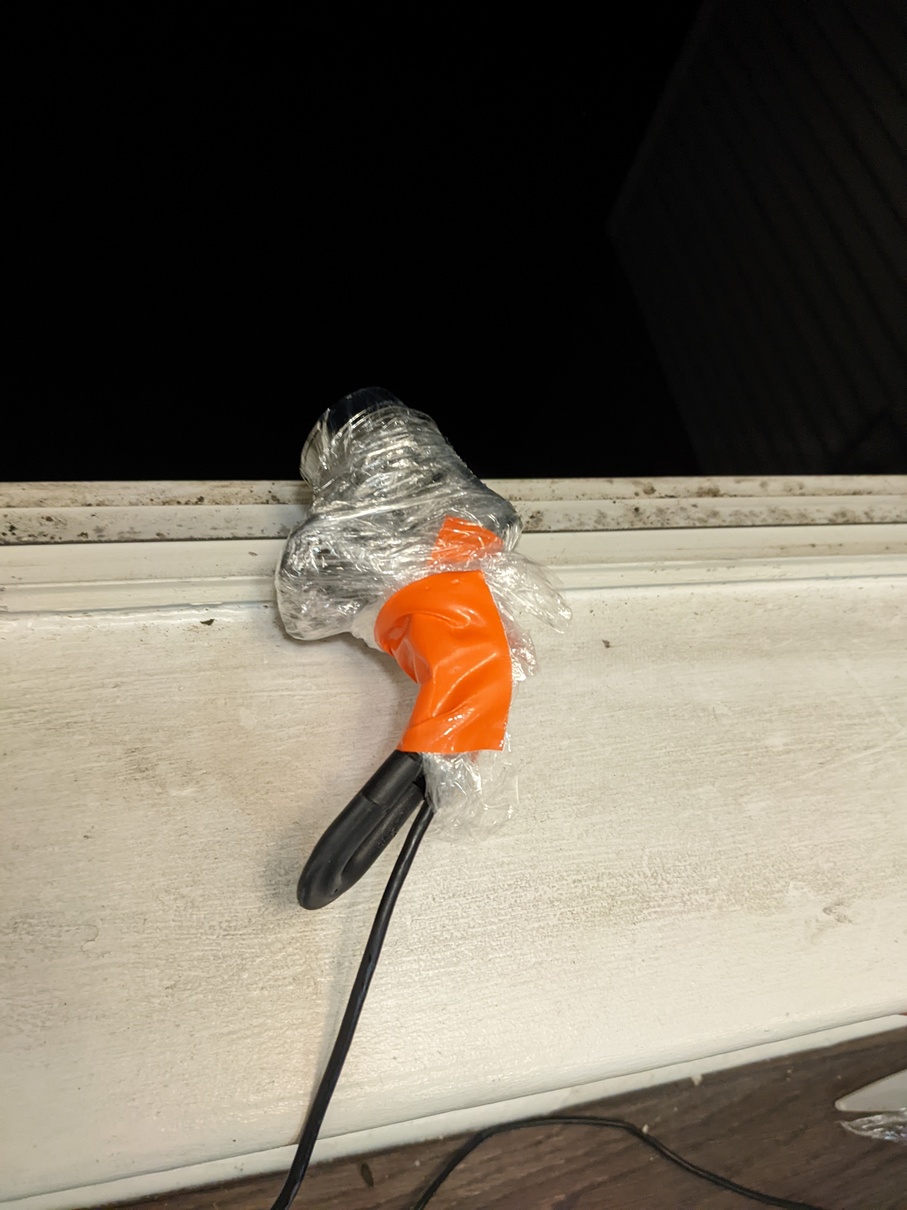
Additional weatherproofing measures included a plastic tupperware lid taped over the camera as a sort of primitive precipitation shield.
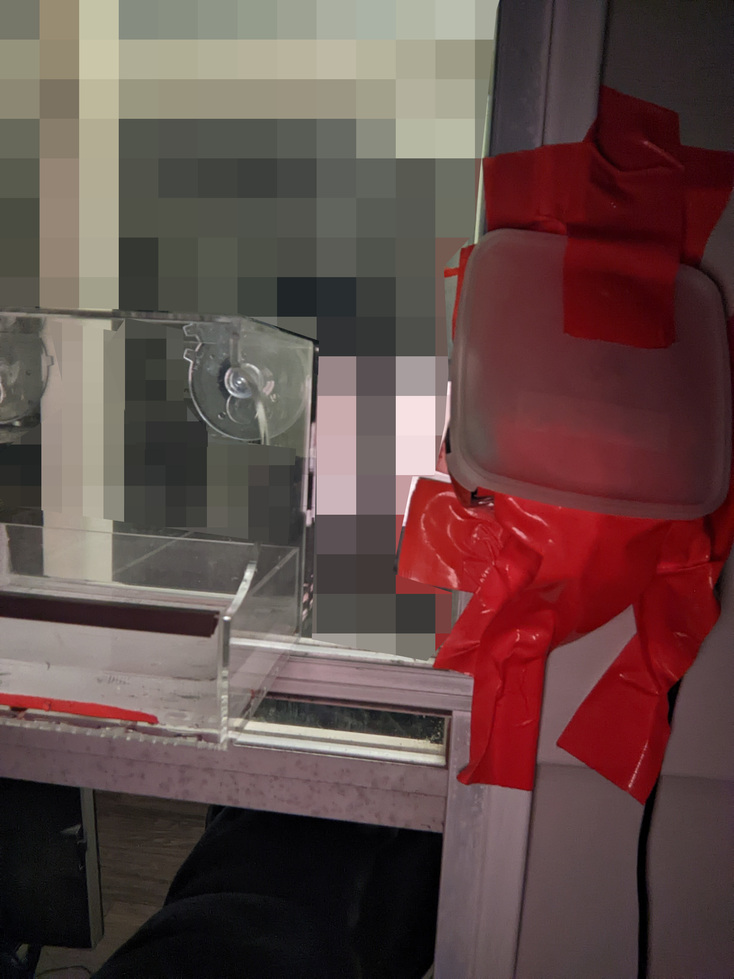
Say what you will, but this setup survived a thunderstorm immediately followed by freezing temperatures and several hours of snow. All for $0.
I should also mention this installation is located on the second floor of my apartment building. Putting it up and performing maintenance involves leaning out of the window, so I was anxious to build a durable, maintenance free installation. At time of writing, with all upgrades in place, it has stayed intact for four days. In my opinion I have succeeded.
Idea
While watching the birds, I found myself wondering about a few of the species I saw. I recognized titmice and chickadees as such, but wasn’t positive on their exact species. A woodpecker that hangs around my place showed up, and I did know its species (Red-bellied woodpecker / Melanerpes carolinus) since I’d looked it up in the past. I recognized bluebirds as well. But I saw some birds I didn’t recognize, and while I was looking up pictures trying to figure out what bird it was, it hit me - this is a textbook computer vision problem. I could build something that used realtime computer vision to identify birds as they appeared on camera.
Investigation
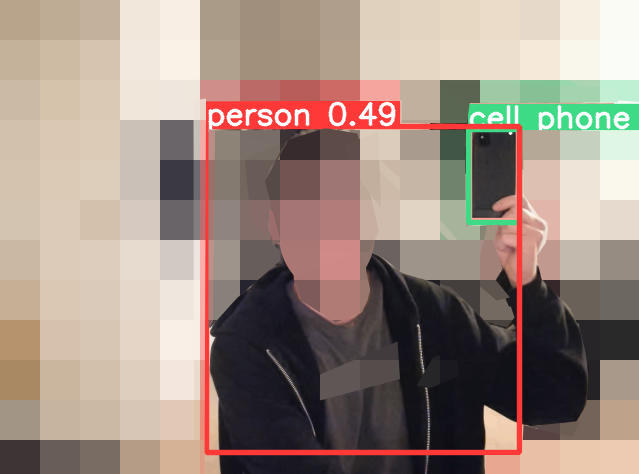
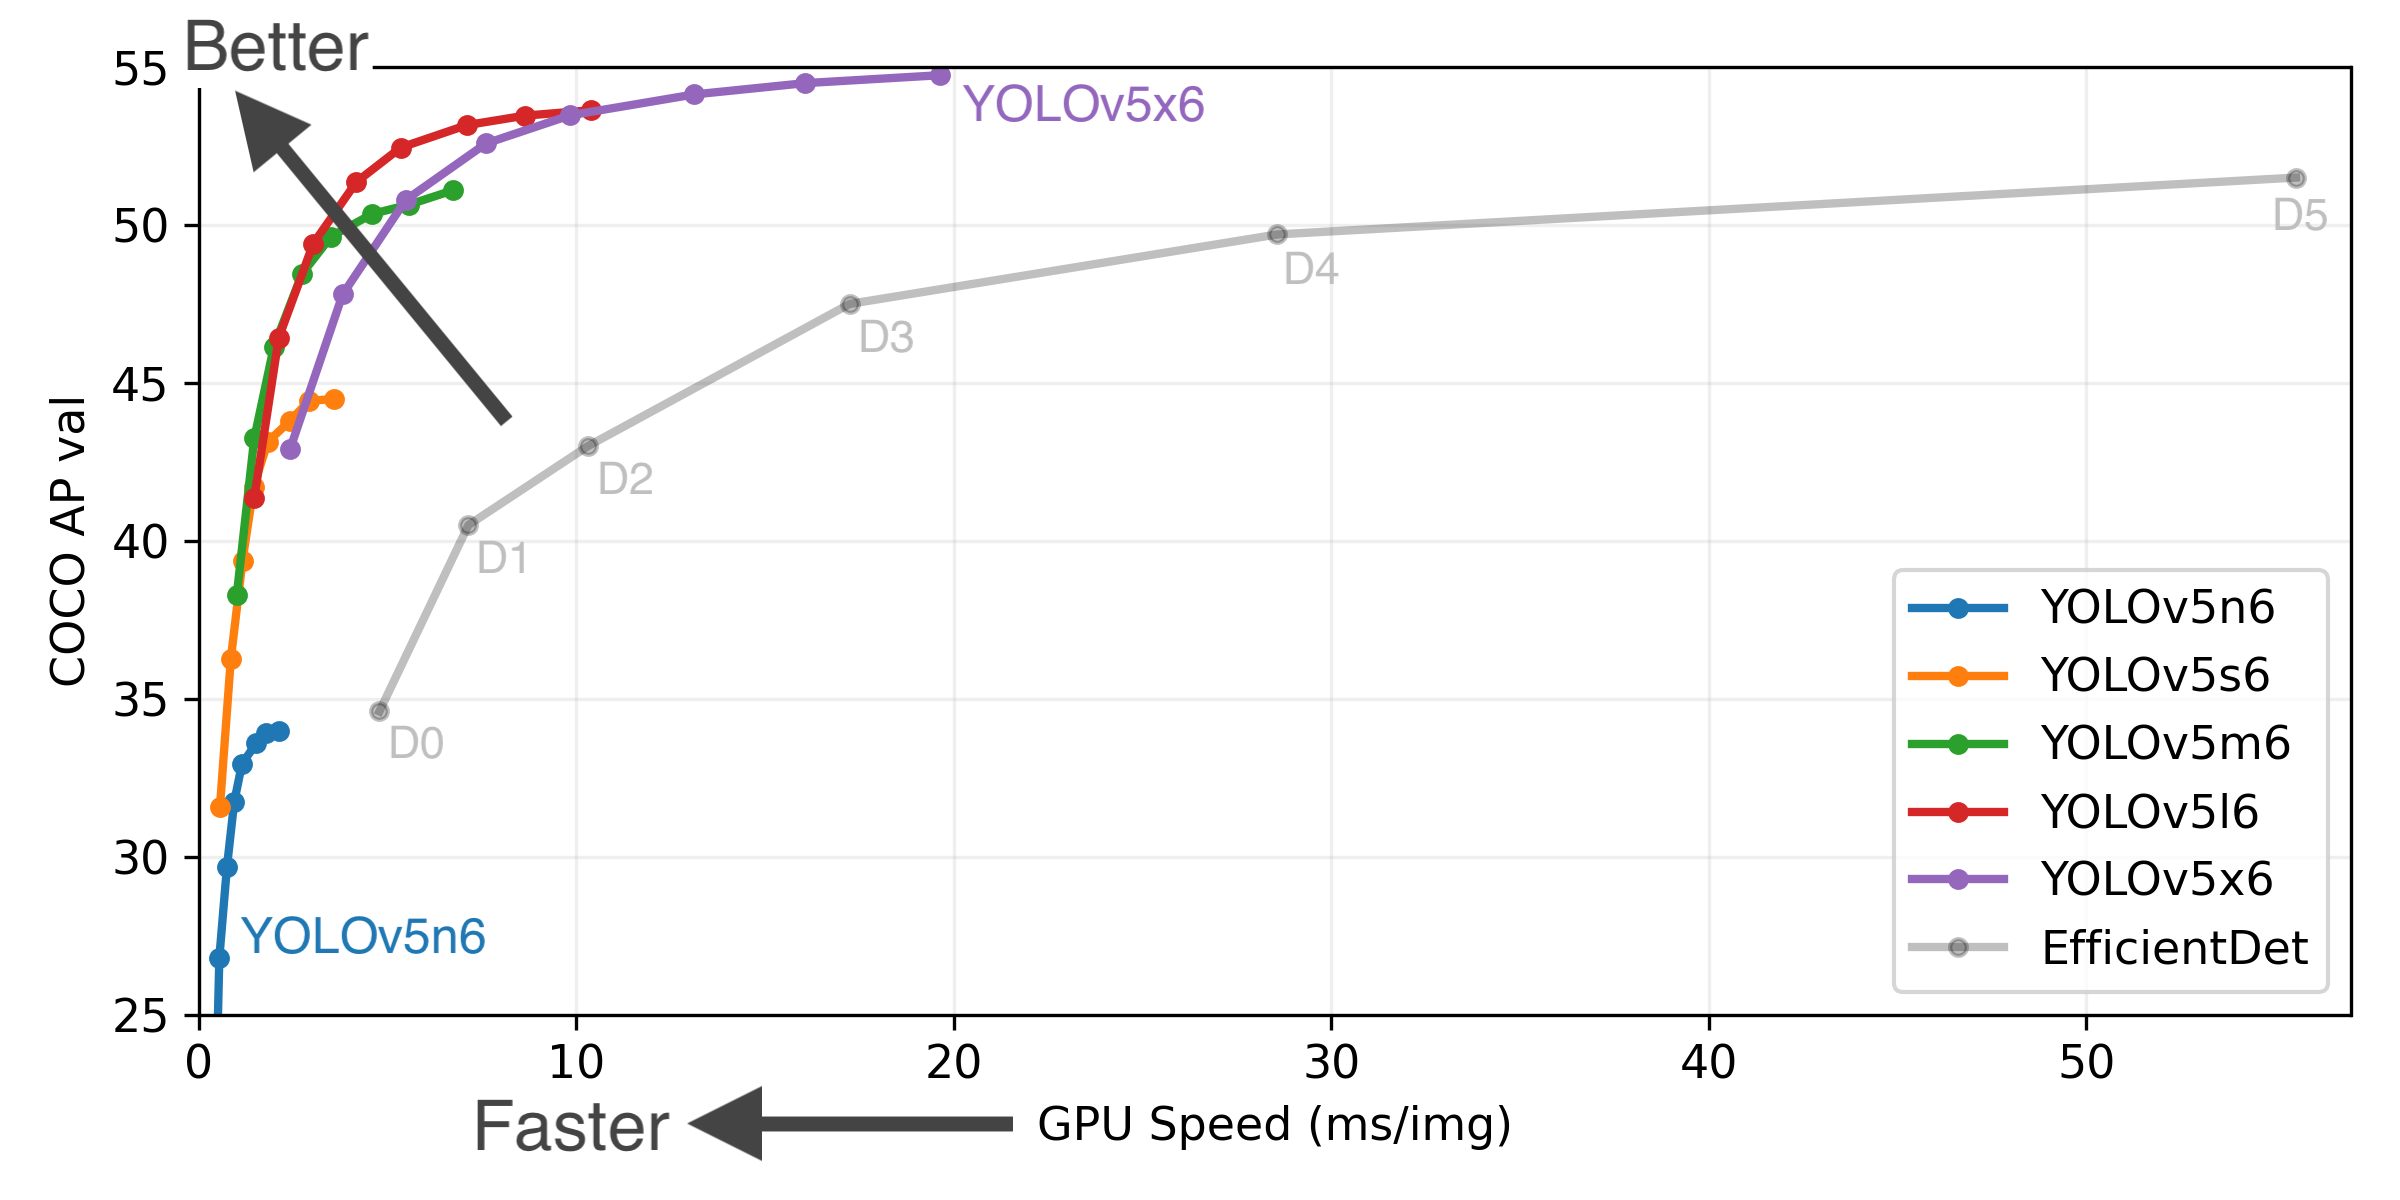
I’d read about YOLO some years before and began to reacquaint myself. It’s come quite far and seems to be more or less the state of the art for realtime computer vision object detection and classification. I downloaded the latest version (YOLOv5 at time of writing) and ran the webcam demo. It ran well over 30fps with good accuracy on my RTX3080, correctly picking out myself as “person”, my phone as “cell phone”, and my light switch as “clock”.
Out of the box YOLOv5 is trained on COCO, which is a dataset of _co_mmon objects in _co_ntext. This dataset is able to identify a picture of a Carolina chickadee as “bird”. Tufted titmice are also identified as “bird”. All birds are “bird” to COCO (at least the ones I tried).
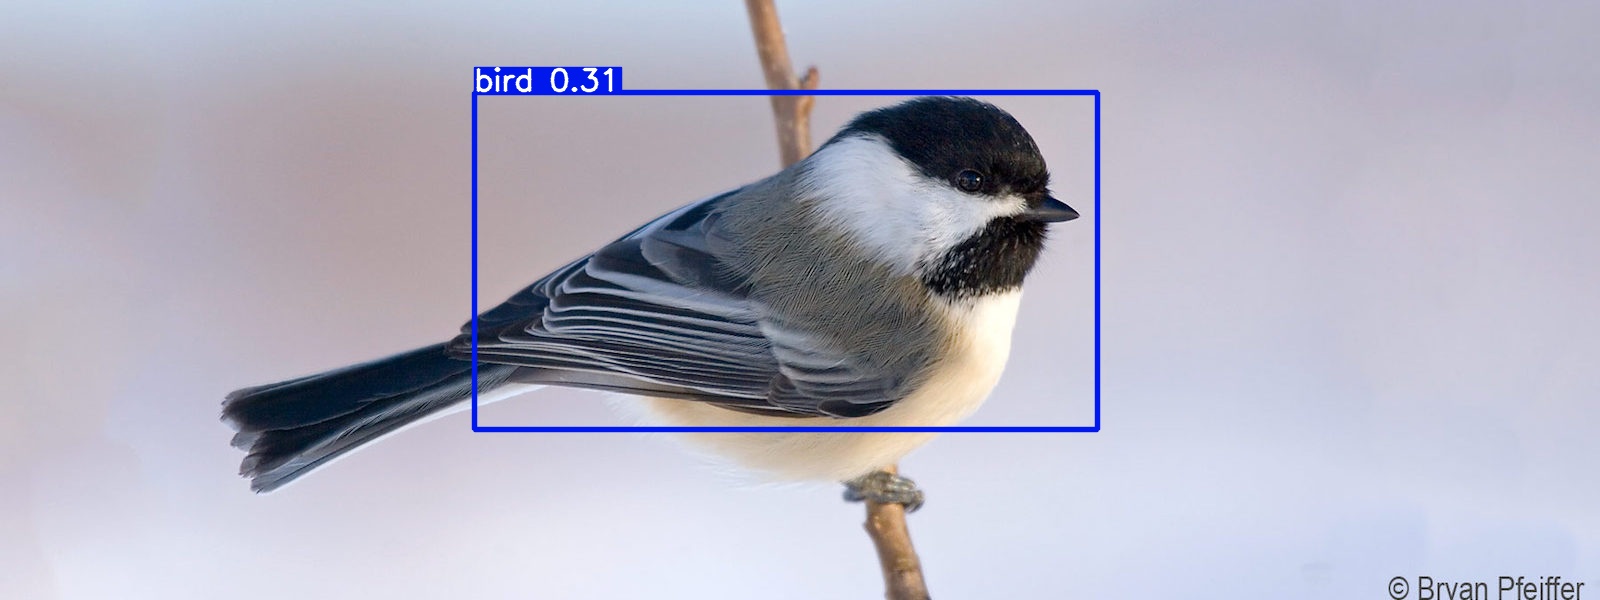
Pretty good, but not exactly what I was going for. YOLO needed to be trained to recognize specific bird species.
Dataset
A quick Google search for “north american birds dataset” yielded probably the most convenient dataset I could possibly have asked for. Behold, NABirds!
NABirds V1 is a collection of 48,000 annotated photographs of the 400 species of birds that are commonly observed in North America. More than 100 photographs are available for each species, including separate annotations for males, females and juveniles that comprise 700 visual categories. This dataset is to be used for fine-grained visual categorization experiments.
Thank you Cornell! Without this dataset, this project probably would not have been possible.
The dataset is well organized. There’s a directory tree containing the images, and a set of text files mapping the file IDs to various metadata. For example, one text file maps the file ID to the bounding box coordinates and dimensions, another maps ID to class, and so on.
Did I mention this dataset also contains bounding box information for
individual parts of the birds? Yes, each of the over 48,000 bird pictures
is subdivided into bill, crown, nape, left eye, right eye, belly, breast,
back, tail, left wing, right wing components. It’s like the holy grail for
bird × computer vision projects. For this project I did not need the parts
boxes, but it’s awesome that Cornell has made such a comprehensive dataset
available to the public.
While well organized, I’m pretty sure this is a non-standard dataset format. YOLOv5 requires data to be organized in its own dataset format, which is fortunately quite simple. To make matters easier, NABirds comes with a Python module that provides functions for loading data from the various text files. Converting NABirds into a YOLOv5 compatible format was fairly straightforward with some additional code. Cornell’s terms of use require that the dataset not be redistributed, so I cannot provide the converted dataset, but I can provide the code I used to process it.
Training
With the dataset correctly formatted, the next step was to train YOLOv5 on it. This can be somewhat difficult depending on one’s patience and access to hardware resources. Training machine learning models involves lots of operations that are highly amenable to acceleration by GPUs, and to train them in a reasonable timeframe, a GPU or tensor processor is required. I have an RTX3080 at my disposal, so it was easy to get started on my personal desktop.
YOLOv5 offers multiple network sizes, from n to x (n for nano, x for
x). n, s and m sizes are recommended for mobile or workstation
deployments, while l and x variants are geared towards cloud / datacenter
deployments (i.e. expensive datacenter GPUs / tensor processors). The larger
variants take longer to train and longer to evaluate. Since the model needed to
be evaluated on each frame in a video feed, holding all else constant, for this
project the choice of model size would ultimately dictate the achievable
framerate.
Since the webcam demo with the s model ran at a good framerate on my GPU I
chose that one to start.
Training certain kinds of machine learning models is memory intensive. In the case of YOLO, which uses a convolutional neural network (CNN), less GPU memory means fewer images can be processed in a single gradient descent step (the ‘batch size’), significantly increasing the time needed to train. It’s worth noting that training with a smaller batch size shouldn’t affect the final outcome too much, so patience can compensate for lack of GPU memory if necessary. In my case the largest batch size I could get on my GPU was 8.
Training YOLOv5s on my RTX3080 took about 23 hours to train 100 epochs with a
batch size of 8. Each epoch represents one complete processing of the training
dataset. General advice for YOLO is to use about 300 epochs. Since training
typically involves a trial-and-error process of tweaking parameters and
retraining, and I wanted to try using the m model, clearly the 3080 was not
going to be sufficient to get this project done in the desired timeframe. This
was a holiday project for me, I wanted it done before the end of the holidays.
I knew people use cloud compute services to train these things, so it was time to find some cloud resources with ML acceleration hardware. To that end I logged into Google Compute. Some hours later I logged into AWS. Some hours later I logged into Linode. At Linode, I had an RTX6000 enabled instance within about 10 minutes. To this day, I still cannot get GPU instances on GCP or AWS - and not for lack of trying. GCP seemingly had no GPUs available in any region I tried, and I tried several, each with advertised GPU availability. AWS required me to open a support case to get my quota for P class EC2 instances increased, which was denied after three days. I find it amusing that Linode is able to provide an infinitely better experience than Google and Amazon. Speculating, it seems plausible that perhaps AWS and GCP are being flooded by cryptocurrency workloads and Linode is not, or is more strict about banning miners. I have no insight into that. Overall, it seems cloud GPU compute is more difficult to get than I had imagined.
The RTX6000 allowed me to use a batch size of 32, which brought training within
a reasonable timeframe of about 2 days for the m model at 300 epochs. Good
thing, because at $1.50 an hour, those VMs aren’t cheap. A few days of training
was about as much as I was willing to spend on this project, and the graphs
indicated that the classification loss was on the order of 3% - more than
sufficient for a fun project.
Note: Machine learning models are typically trained on some subset of the total available data, with the rest being used to evaluate the model’s performance on data it has not seen before. One of the metadata files provided with the dataset defines a suggested train/test split, classifying each image by its suggested usage. I tried training with the suggested split, and results were significantly worse than using a standard 80/10/10 (train/test/validate) split.
For the data oriented, here is the summary information for the training run of the model I ended up using:
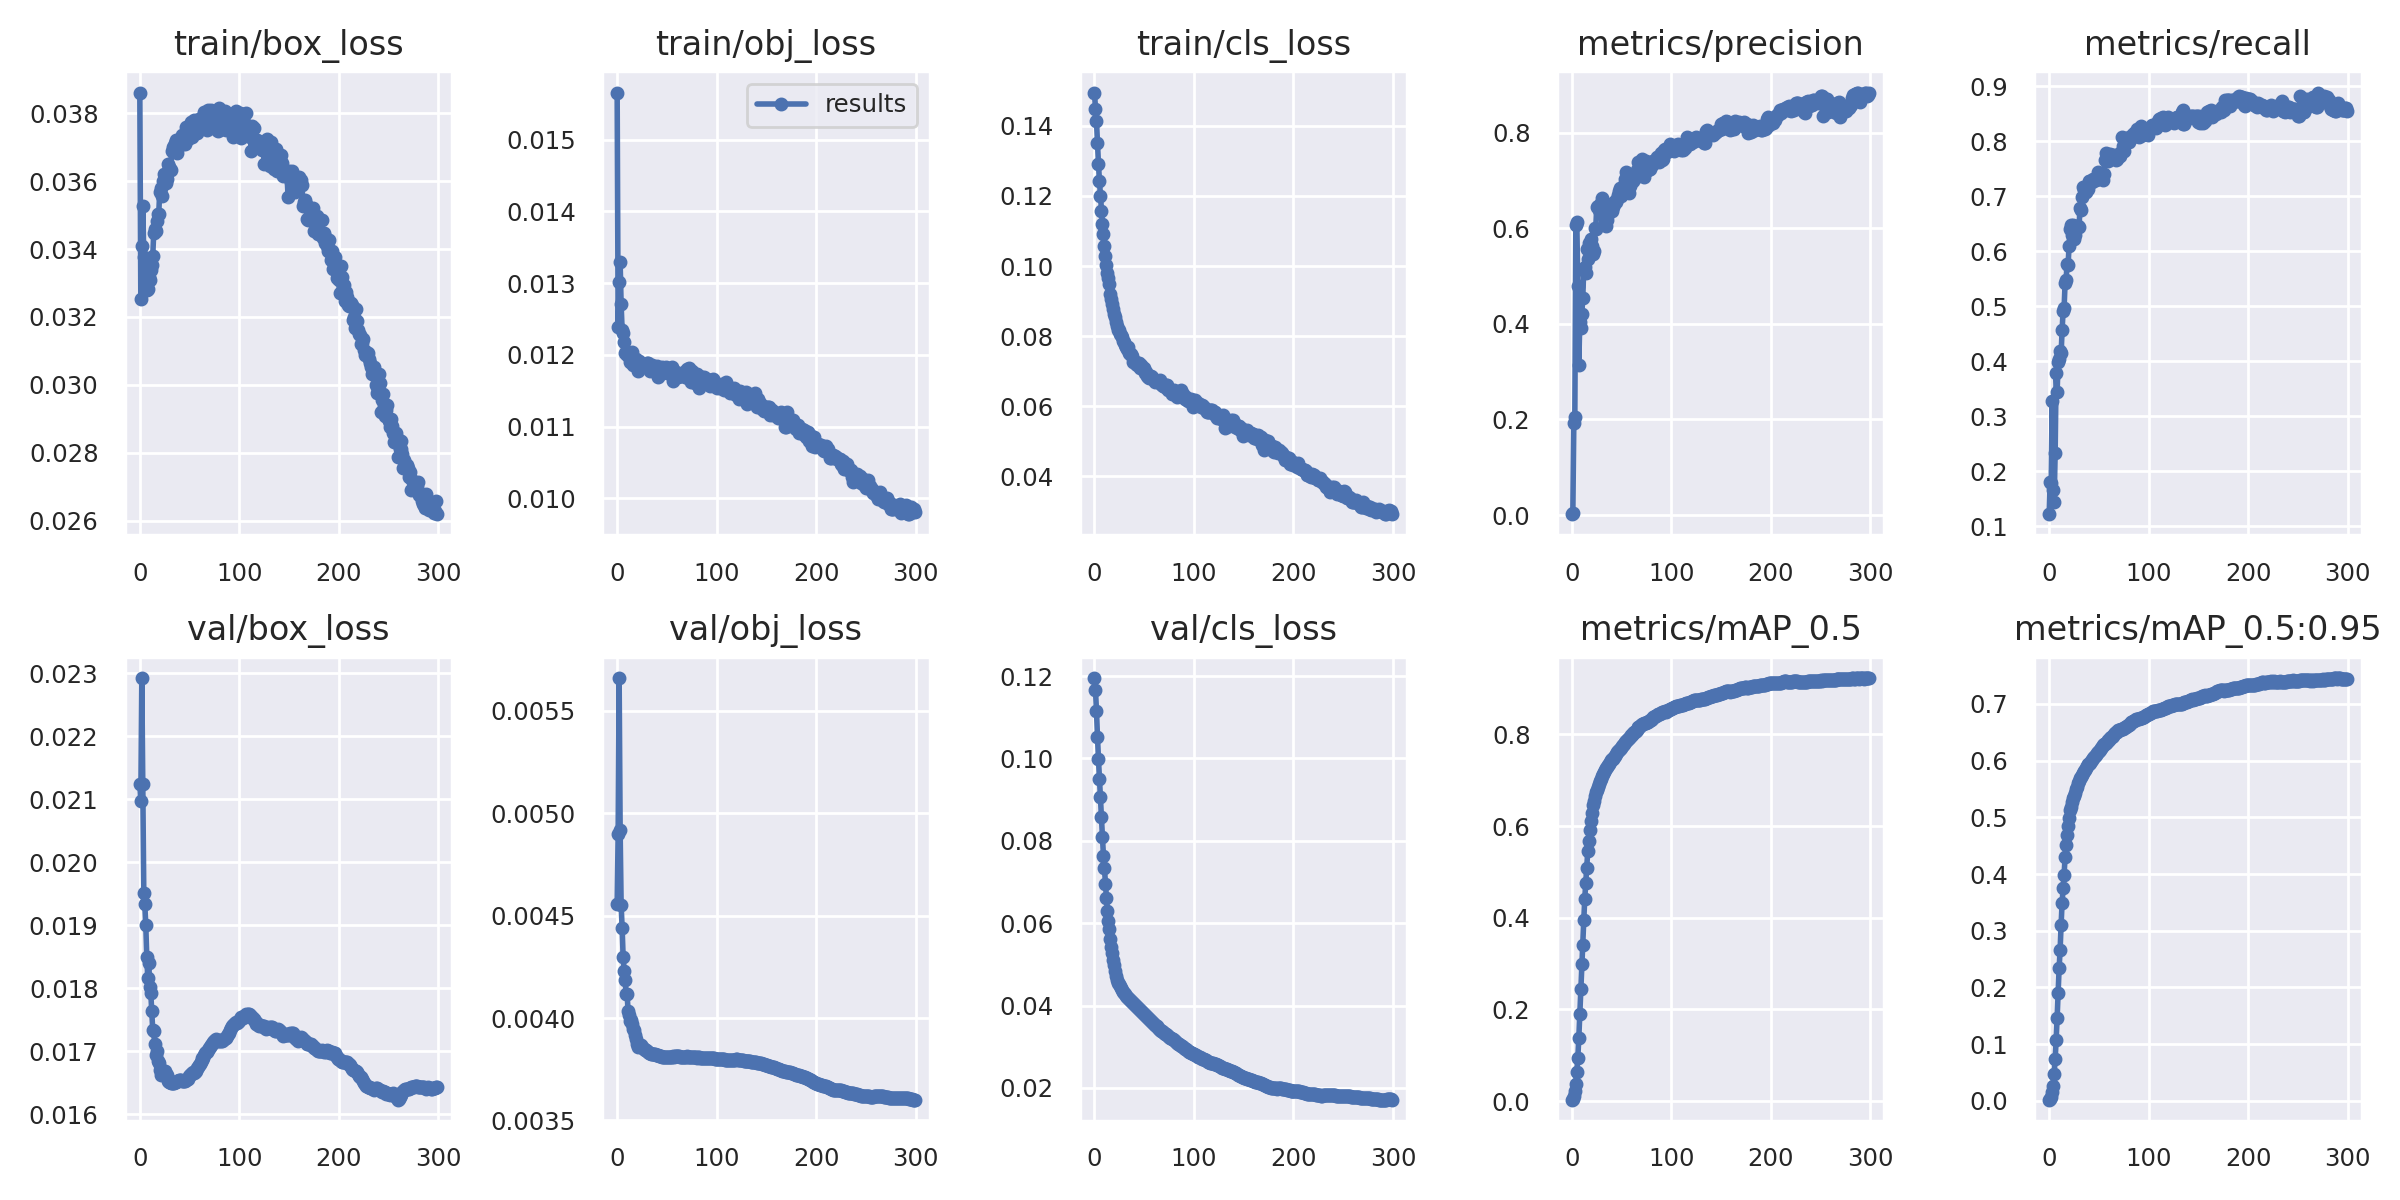
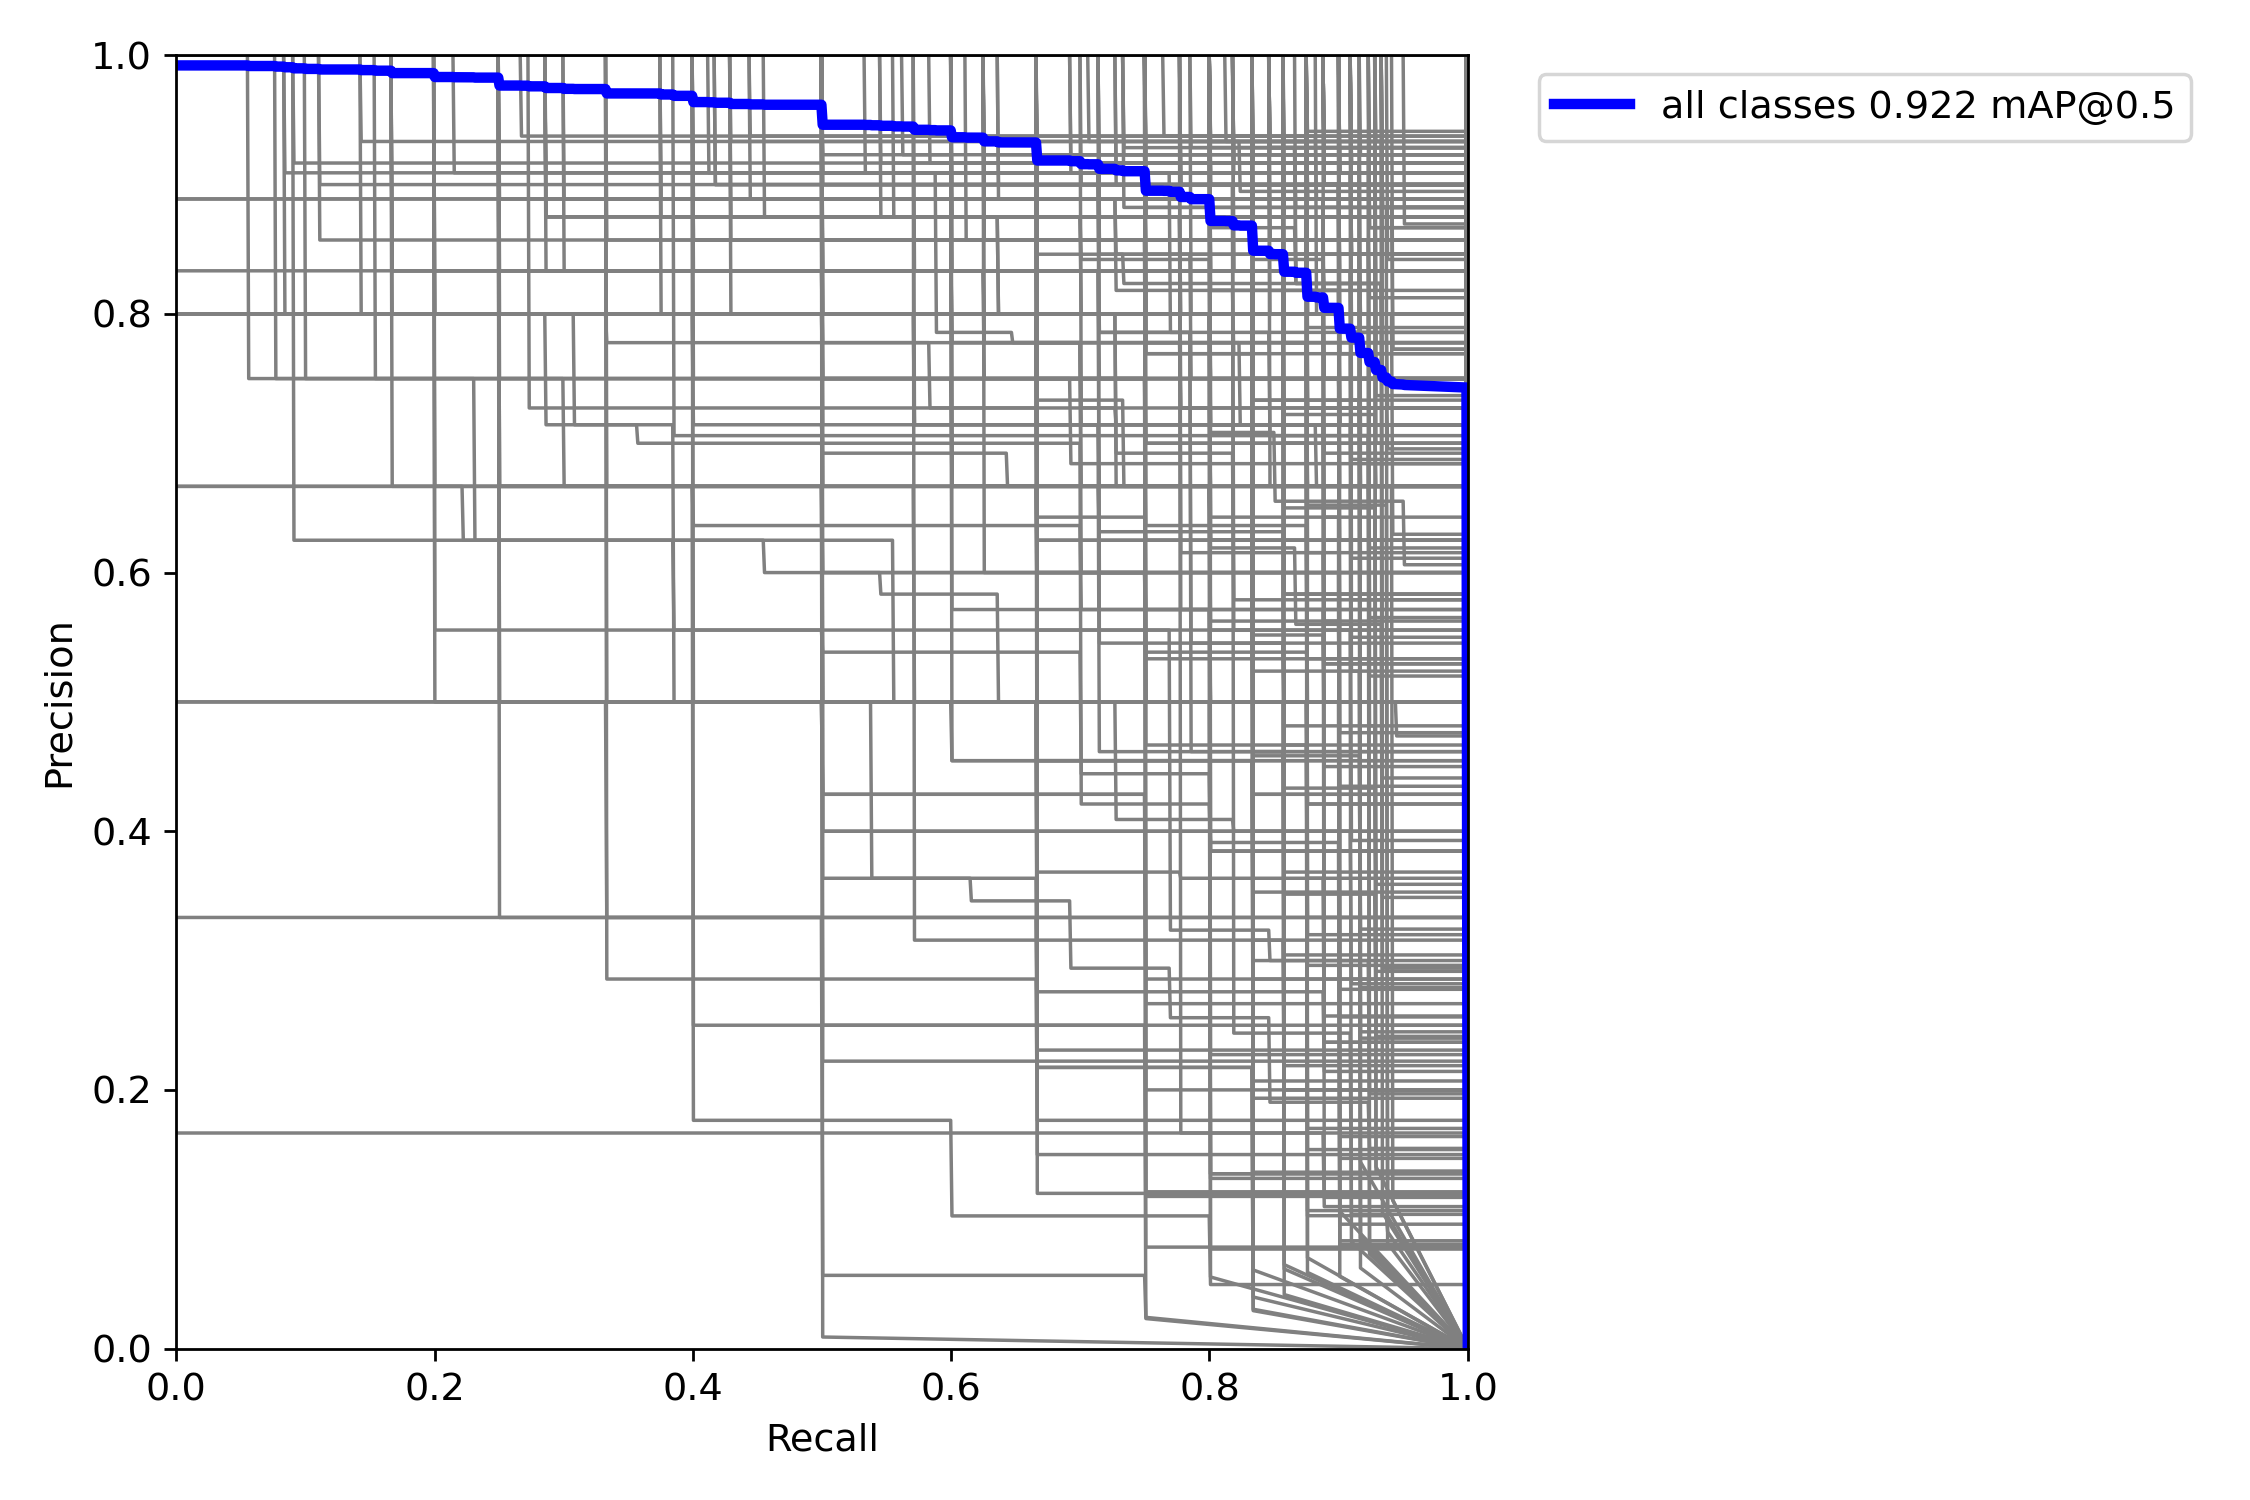
These metrics are all good and show that the model trained very nicely on the dataset.
At this point after waiting for training to finish I was quite excited and ready to try it out. I ran it on a couple of clips from my bird stream and was amazed at the results.
Trying it on an image with three species of chickadee, that to my eye look almost identical:
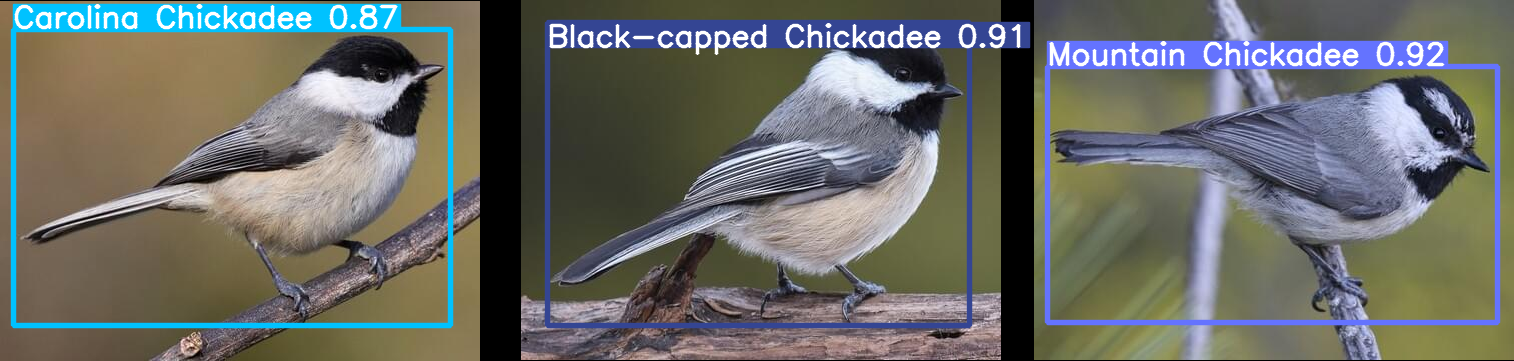
I’m not sure if these were in the training set; I just searched for the first images of each species I found on Google Images.
The accuracy is impressive. YOLOv5 has certainly achieved its goal of making state of the art computer vision accessible to people outside that field.
If you’d like to use my models, they’re available here.
Video flow
Having demonstrated that it could identify birds with relative accuracy, it was
time to get it working on a live video feed. Even though YOLO is amazingly fast
relative to other methods, it still needs a GPU in order to evaluate the model
fast enough to process video in real time. I set a goal of 30fps; on my 3080,
my final model averages roughly 0.020s per frame, sufficient to pull around
40-50fps. This is a good tradeoff between model size/accuracy and evaluation
speed. The average with the s model looks to be roughly 0.015s, technically
sufficient to pull 60fps, but without much headroom. There are spikes up to the
0.02 range, suggesting that 60fps would likely be jittery. The webcam I used
for this project didn’t really suffice anyway.
So while I had a GPU that can perform inference fast enough, the problem was that the video feed was in the next room, and I don’t much feel like moving my desktop into the kitchen. I considered several approaches to this problem, including:
- A very long USB extender to the webcam
I actually tried this, and it did work. The problem was that it required me to
have my bedroom window open a little bit to route the cable through it, which
isn’t ideal for several reasons. It also caused difficulties with detect.py,
the program included with YOLOv5 that provides a convenient interface to
performing inference on various media sources; when given a direct webcam feed,
the output is 640x640. I wanted to use the full resolution of the camera
(1920x1080). I briefly investigated patching detect.py, but the holidays were
drawing to a close and I wanted a functioning stream sooner rather than later.
- eGPU enclosure attached to the webcam host
By this point in the project I’d replaced the laptop with a NUC I happened to have lying around. If this was a recent NUC with Thunderbolt 3 support, an eGPU enclosure would have been the cleanest and easiest solution. While I do have a spare GPU I could have used, this NUC had no capability to support an eGPU and I didn’t have an enclosure. This route would have entailed purchasing a new NUC and an eGPU enclosure - neither of which are particularly inexpensive - and waiting for delivery. Nixed this option.
- Some kind of network streaming setup
No cables through windows, no expensive enclosures. I have a pretty good home network. This is what I went with. After several hours experimenting with RTMP servers, HTTP streaming tools, and the like, I ended up with this setup:
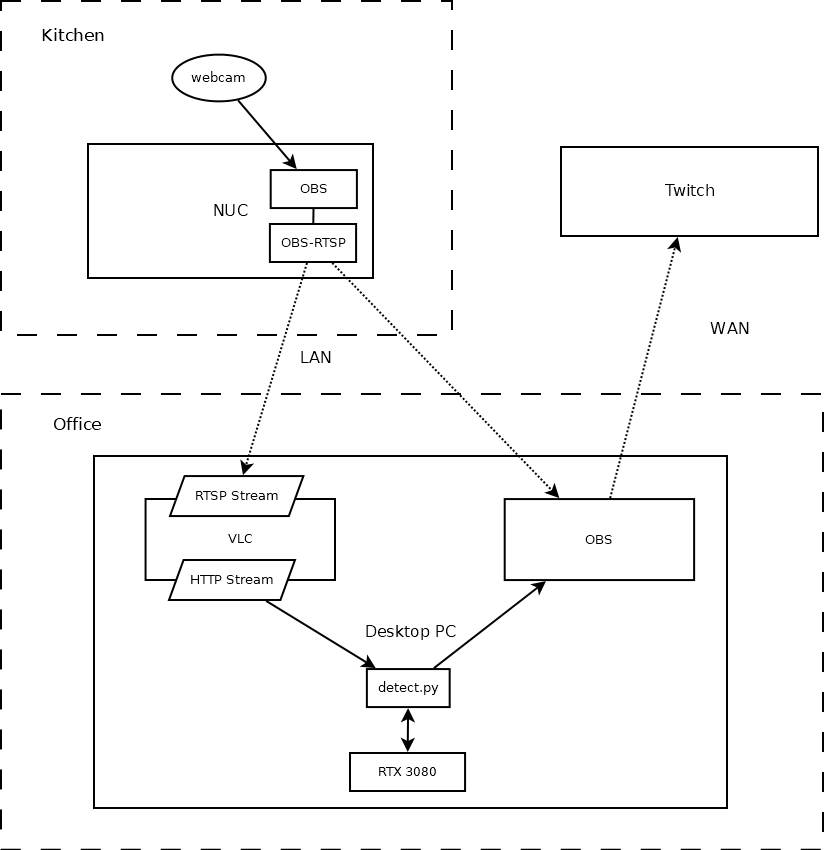
I tried a bunch of other things, including streaming RTMP to a local NGINX
server, using VLC as an RTSP source on the webcam box, etc, but this was the
setup that was the most stable, had the highest framerate, and lowest
artifacts. Actually detect.py does support consuming RTSP feeds directly, but
whatever implementation OpenCV uses under the hood introduces some significant
artifacts into the output. Using VLC to consume the RTSP feed and rebroadcast
it locally as an HTTP stream turned out better. The downside to this is that
VLC seems to crash from time to time, but a quick batch script fixed that right
up:
:start

taskkill /f /im "vlc.exe"

start "" "C:\Program Files (x86)\VideoLAN\VLC\vlc.exe" rtsp://192.168.0.240:554/live --sout #transcode{vcodec=h264,vb=800,acodec=mpga,ab=128,channels=2,samplerate=44100,scodec=none}:http{mux=ts,dst=:8081/localql} --no-sout-all --sout-keep
timeout /t 15

python detect.py --nosave --weights nabirds_v5m_b32_e300_stdsplit.pt --source http://127.0.0.1:8081/localql

goto start
Why yes, I do have Windows experience :’)
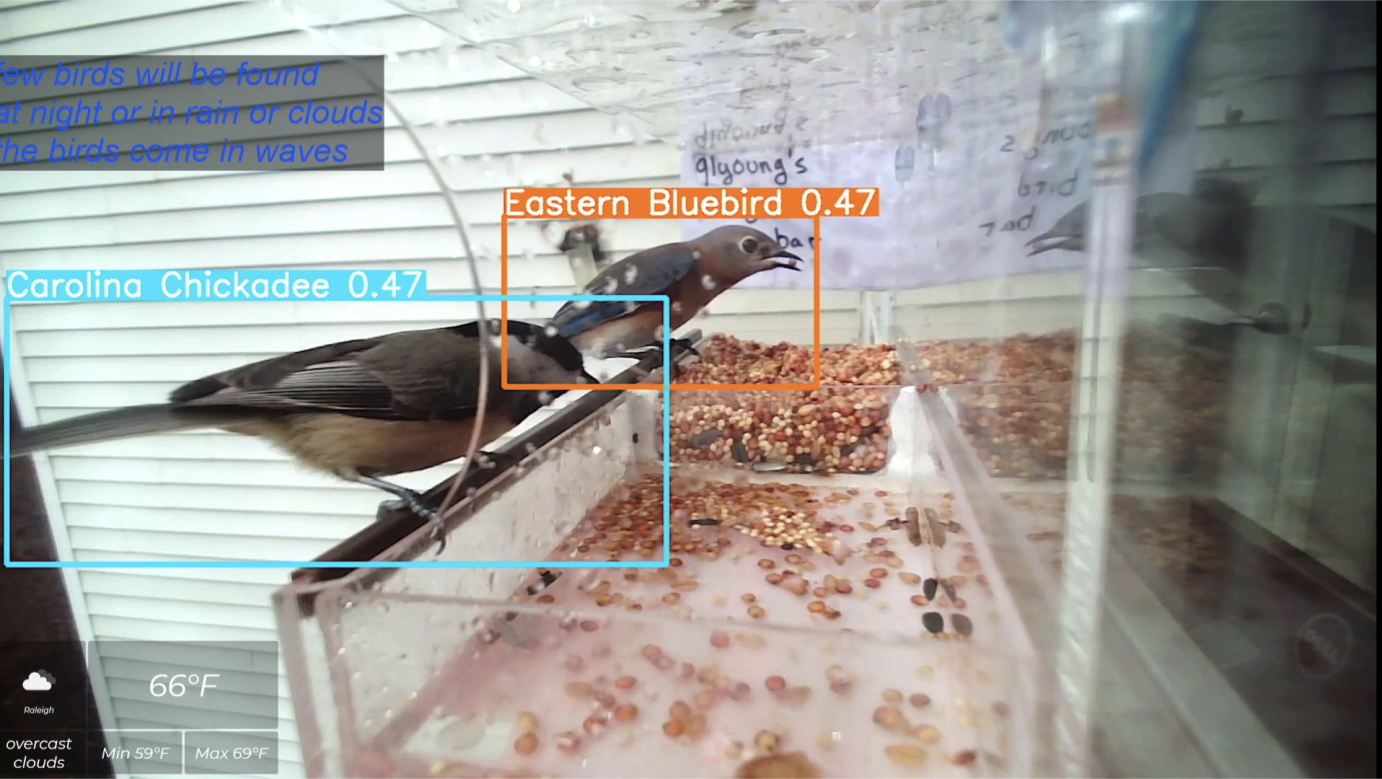
Birds!
With all the work done, time to relax and watch some birds.
These were the first birds to appear and be identified live on camera. Congratulations.
Over the past few days I have seen the following species:
- Tufted titmouse
- Carolina chickadee
- Carolina wren
- Red bellied woodpecker
- White-breasted nuthatch
- House finch
- Pine warbler
- Eastern bluebird
- House sparrow (?)
The model is able to reliably identify all of these with the exception of the sparrow. It could not decide between a house sparrow, field sparrow and 2-3 other species of sparrow. In the model’s defense, they look quite similar, and I’m not quite sure which one I was looking at.
In the case of sexually dimorphic species that also have appropriate training examples, such as house finches, it’s even capable of distinguishing the sex.
In a few cases, such as the nuthatch and the pine warbler, the model taught me something I did not know before. Reflecting on that, I think that makes this one of my favorite projects. Building a system that teaches you new things is cool.
Conclusions
Overall I was extremely satisfied with the results of this project. It took about 5 days to complete. I learned something at each step.
I can think of a lot of things to do with this project, in no particular order:
- Collect statistics on birds seen, perhaps uploading these to ebird
- Bot that posts somewhere when a bird is seen
- Retrain with background images to reduce false positives
But for now I’m just enjoying watching the birds.